
It’s that time of year again. The latest major release of SolidWorks is upon us, and with it comes a delightful assortment of awesome new enhancements to the SolidWorks API.
New API Calls
Here’s a list of the most significant:
- Access feature data for Mirror Part and Fill Pattern features.
- Access flat-pattern and sheet metal folders in the FeatureManager design tree.
- Insert a Variable Pattern feature in the FeatureManager design tree.
- Create a new part document that mirrors another part document about a selected reference plane or planar face.
- Attach an existing annotation to a drawing sheet or view.
- Replace the model in selected drawing views.
- Get and set whether a part is a SolidWorks Toolbox part.
- Access and control SolidWorks CommandManager tabs
- Notification events for when CommandManger tabs are activated for parts, assemblies, and drawings.
- Get and set whether to override default sheet metal feature parameters.
- Get and set whether to use a sheet metal feature gauge table.
- Get the actual entities associated with a sketch relation.
- Save various aspects of a part (sheet metal, faces, loops, and annotation views) to one or more DXF/DWG files, preserving the specified filename.
- Get all visible entities, including silhouette edges, in drawing views.
- Send notification when a document is printed.
- Get the persistent IDs of components and features.
- Insert general table annotations in part and assembly documents.
You can view the full list of enhancements here. If you want to learn the actual API calls that correspond to these enhancements, the easiest way is to open the local API Help, go to the Search tab, and type “Version 2014”. You can find what you need in that list.
Any of these excite you? In particular, I am glad that we now have a sure-fire way of identifying toolbox parts. Previously we were left with examining the component’s file path—if the path pointed to a known toolbox folder, then we would consider it a toolbox part. That’s the technique used in this video which shows how to write a macro to delete ballooned fasteners in a drawing view.
Favorites Tab
If you’re using the online API Help… stop. Yes, really. Stop it now. You didn’t have much of excuse to use it before, considering how hard it is to navigate. Now that the local API Help has been beefed up with a “Favorites” tab, effectively mimicking a web browser’s bookmark/favorites capability, you simply have no excuse. Observe:
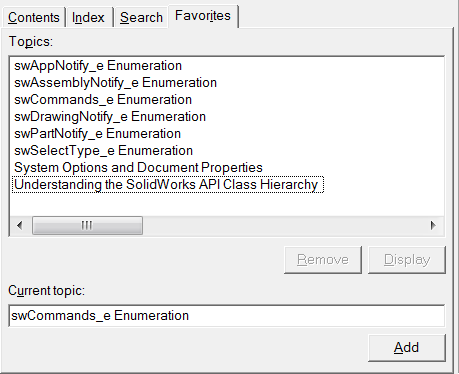
You can also see the list of API Help pages that went into my Favorites tab immediately, not because I visit them everyday but because when I do need to visit them, they can be a real nuisance to locate using the Index tab or Search tab.
Don’t Forget to Request Enhancements
The SolidWorks API development team wants to hear your ideas for enhancement requests. I am happy to say that many of my suggestions in the past have been added in the subsequent release, including the toolbox identification API call I just mentioned. If you run across an area of SolidWorks that doesn’t have good API support, let the API team know. You can contact them here.
That concludes our look at what’s new in the SolidWorks 2014 API. Anything stand out to you? Share your thoughts in the comments below!
Keith
Want to keep up with future CADSharp.com content, webinars, and special offers? Sign up for our newsletter.


Leave Comment
This video summarizes the contents of this post and demonstrates the examples listed below.
Ever wanted a macro so tightly integrated with a part or assembly that 1) the macro always ran as long as the model was open, 2) the macro traveled with the model wherever it went? Using a clever, undocumented trick involving equations and the Design Binder, both of these are possible with little initial setup. The result is what I call Equation-Triggered Macros.
Note: As of SolidWorks 2015, Equation-Triggered Macros do not appear to be working at all. They are also not supported by SolidWorks Corporation. Use at your own risk.
Case Study
For our case study, let’s consider a problem I received from a friend a few weeks ago. His parts need to have their custom properties listed in alphabetical order. To reduce time and error, he could create an event notification macro that runs on SolidWorks startup and sorts the custom properties on every rebuild. Starting the macro with SolidWorks requires modifying the SolidWorks shortcut arguments on the user’s computer.
Two problems arise. First, you’ve now created a lot of administrative work for yourself because every user’s computer needs to be set up to automatically run this macro. Second, if the user doesn’t open SolidWorks through the modified shortcut then the macro will not run. Here’s how you can alleviate both problems without creating even more administrative work for yourself.
Step One : Write the Macro
Self-explanatory. In our case, we need to write a macro that sorts the custom properties alphabetically when it is run.
Step Two : Embed or Reference the Macro
Embedding versus referencing is essentially the same idea as embedding a design table within a document versus linking to it at an external location. If you embed, the macro travels with the document. No concerns about the macro getting lost or the link path becoming invalid. But if you need to change the macro code in lots of models? That could be a real chore (though you could write a macro that does this for you—more on that in the last section). If you think you’ll need to change the code regularly or simply want to remain in control of the code at all times, referencing is safer.
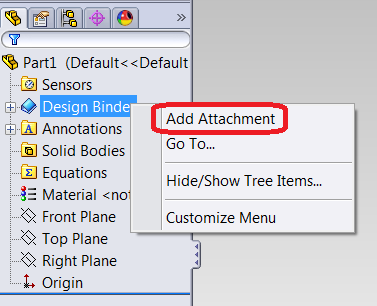
Embedding a macro in a document is pretty simple. While you have a part or assembly open, right click on the Design Binder (you might have to make it visible using Hide/Show Tree Items if it isn’t already) and choose Add Attachment. Browse for the .swp file, click OK, and you’re done!
Note: Embedding works with VBA macros only.
Referencing a macro is also simple. Just put the macro in the desired hard-drive / network location and copy the path. We’ll use the path in the next step.
Step Three : Add An Equation That Calls The Macro
This is where it gets interesting. Josh Brady, a long-time SolidWorks API enthusiast, made an incredible discovery back in 2007. Noting that you could use the VBA “iif” function in SolidWorks equations, he decided to see if other VBA equations could be used as well. The answer? Any and all VBA functions can be used as long as you format them properly! He also discovered that the same is true for custom properties. If you want to learn all of the guidelines and caveats for using VBA in equations, you can watch his excellent SolidWorks World 2011 presentation titled “Advanced Equations Using VBA and API Code”. The presentation files can be downloaded here.
Without going into details about formatting, here are the equations you need for embedding and referencing a macro named “macro.swp” with a sub-procedure named “main” in a module named “mMain”. Once you add the appropriate equation, each time your part or assembly rebuilds, the macro will be run.
Embedding
"Var1"= 1::swApp.RunAttachedMacro "macro.swp", "mMain", "main"
Referencing
"Var2"= 1::Dim lngErr As Long::swApp.RunMacro2 "C:\macro.swp", "mMain", "main", swRunMacroDefault, lngErr
Important comments:
- The variable names are arbitrary and have no effect on the macro itself. If you already have a variable called “Var1” or “Var2”, then use another name.
- The arguments for ISldWorks::RunAttachedMacro and ISldWorks::RunMacro2 need to match your macro name/path, module, and entry point. See the API Help articles for more details. In other words, unless your macro is named “macro.swp” and contains a sub-procedure called “main” in a module called “mMain”, using the code above verbatim will not trigger your macro!
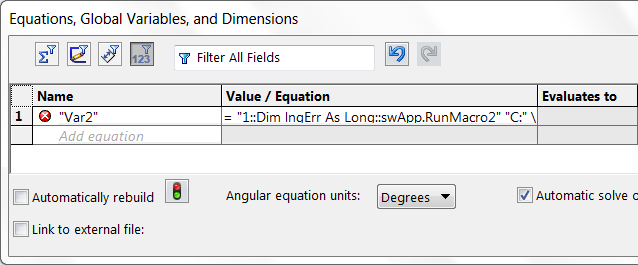
- Since SolidWorks 2012, the Equation Manager makes it difficult to add these equations due to the equation checker disliking the syntax of equations containing VBA code. To make sure you’ve added the equations properly, you should put the equation in a text file and then import that text file. As shown in the image below, the resulting equation may not successfully evaluate and the syntax may appear incorrect, but it should still work. If you struggle to get the Equation Manager to accept the equation, use Luke Malpass’ equation editor tool that lets you bypass the syntax checker. Please note that as long as the check next to the equation is gray, the equation has not been accepted and will not work.
Going To The Next Level
At this point you should see the unique flexibility and power offered by equation-triggered macros (ETMs), possibly in conjunction with the Design Binder. With the “vanilla” ETM setup I’ve just shown you, however, the macro always runs when the part rebuilds, and sometimes you need more control over when the macro runs. To give you that control, I’ve created a class called ETMUtil that you can add to a macro (whether embedded or referenced) that gives you the following options:
- Only allow your code to trigger once within a specific time period (e.g., 30 seconds).
- Only trigger your code once when the part is opened.
- Only trigger your code once the first time a part is opened, but never on subsequent openings. This might be used with part or assembly templates for example, to aid the initial configuration of the model.
- Delete the temporary macro files. When a macro is run from the Design Binder, a copy of the macro is created in C:\Users\\AppData\Local\Temp and then run. Due to known bug (SPR 400218) SolidWorks never deletes these files, so they can build up over time. If you think this could become a problem over time and you don’t want to remember to delete them manually, ETMUtil can help. Obviously this problem is avoided entirely if you reference the macro instead of embedding it using the Design Binder.
Sound appealing? ETMUtil, and instructions on how to use it, is available to CADSharp.com premium members in the Macro Library under Automation / Tools. Watch the video at the beginning of this post to see ETMUtil in action or check out one of the examples below.
Note: As of SolidWorks 2014, ETMUtil no longer works, because the ability to suppress equations was removed. An alternative solution exists using event notifications, but I have not had time to implement it.
Examples
Here’s the finished version of the part from the original case study we discussed, along with three other examples.
Sort custom properties – Macro is embedded in a part. Every rebuild, the custom properties are sorted into alphabetical order.
Keep bodies renamed – Macro is embedded in a part. Every rebuild, the solid bodies are renamed Body1, Body2, Body3, etc.
Track part usage in assemblies – Macro is embedded in an assembly. Before the assembly is saved, the part level custom properties are updated to contain the number of times the part is used in an assembly. The custom property is named after the assembly. The code triggers before the assembly is saved instead of during each rebuild to improve performance.
Display user form on part open – (Premium members only) Macro is embedded in a part. When the part is opened, a user form is displayed that allows the user to easily change the part material and modify a custom property called “Edited By”. Uses ETMUtil to allow code to prevent any equation-triggers beyond the first one when the part opens.
Answers to Important Questions
Why can’t I use equation-triggered macros with drawings?
Because you can’t add equations to drawings.
Using equation-triggered macros it is possible run code on every rebuild. Is there any way I can listen for other events?
Yes. The macro you embed or reference simply needs to listen for that event using event notifications (see our
Macro Library for examples). In fact, if you wanted to have your code run post-rebuild instead of when the equation recalculates, you could use ETMUtil to turn on a post-rebuild listener as soon as the part opens, prevent any additional equation-triggers, and use that listener to trigger your code.
My macros are in VB.NET / C#. Is there any way I can still use this technique?
Yes. You’ll need to always reference the macros from an external location because .NET macros cannot be run from the Design Binder.
When I edit a macro in the Design Binder and save it, the macro behaves as though I never edited it. Why?
You can’t truly edit a macro that’s in the Design Binder. You need to make edits to a macro that is on your hard-drive or network, then delete out the macro in the Design Binder, and add in the edited macro.
I can’t get the equation editor to accept my equation containing VBA code. What can I do?
First, did you try using Luke Malpass
equation editor tool, which bypasses the Equation Manager’s syntax checker? Second, does part of the equation contain VBA keywords like “if”? For example, a macro called “modify fillet.swp” will confuse the Equation Manager because it thinks that the letters “if” in “modify” are the beginning of an if-then statement. Third, have you tried using the referencing equation rather than the embedding equation? In some instances I’ve seen the Equation Editor refuse to accept one but not the other.
SolidWorks is crashing when my equation-triggered macro runs. Why?
Does your macro edit features or perform any other task that might cause a rebuild? Keep in mind that ETMs run during a model’s rebuild. Causing another rebuild during this first rebuild will probably cause a crash. One way you can avoid this situation is by having your ETM start a post-rebuild listener that performs your task once the model rebuild is finished. The rebuild listener should be set to nothing after it has done its work (see
example), otherwise that same task will keep running during every rebuild, even if you’re using ETMUtil (or your own code) to prevent subsequent triggerings of the code.
Using equation-triggered macros, couldn’t SolidWorks models carry viruses?
Yes, they could. For that reason you should only accept CAD files from trusted sources. Of course, a virus could be implemented in a macro feature as well, so it is not as though this is a new possibility.
How can equation-triggered macros improve .NET macro features?
Unlike VBA macro features, .NET macro features cannot have code that defines the macro feature embedded in the document. This means that if the path to the DLL is invalid, the macro feature will fail. This makes it tedious when sending files containing .NET macro features to other users, because you have to ensure that they have the defining macro and its supporting DLLs in the right path on their end. Using the equation + Design Binder technique, you can place the defining macro and its supporting DLLs in the Design Binder and a macro that verifies that the defining macro exists at the correct location. If it doesn’t, it saves the defining macro and its supporting DLLs to that location.
Conclusion
I hope you enjoyed learning about equation-triggered macros as much as I did. If you have ideas for ways you could use them, I’d love hear about it in the comments.
Onward into new automation frontiers,
Keith
Want to keep up with future CADSharp.com content, webinars, and special offers? Sign up for our newsletter.
Leave Comment
Given the ubiquity of Microsoft Excel in engineering departments worldwide, it is no surprise that our “Using Microsoft Excel with the SolidWorks API” tutorial, available to Premium members, is one of our most popular. While I am not going to cover all of the material presented in that lesson, I do want to provide you with a basic run-down of using the Excel API in a SolidWorks macro, and vice versa. As a bonus, I’ll also cover how to include an Excel macro in SolidWorks design table.
It’s All About the References
Why is it so easy to integrate the Excel and SolidWorks APIs using Visual Basic for Applications? Microsoft created VBA as a way for users to program with the APIs of their Office products. They also made VBA available to third-party software developers (like SolidWorks Corporation) to integrate in their software. So that’s what SolidWorks Corporation chose to do—use VBA as one way to create macros in SolidWorks. Consequently, SolidWorks users get to use the same language and development environment to program in both SolidWorks and Microsoft Office. Very convenient!
But here’s an important point that many novice API programmers miss: VBA doesn’t automatically understand SolidWorks API code. Rather, SolidWorks Corporation chose to expose SolidWorks API interfaces and calls and store them in “type libraries”. By default these libraries are located in the root directory of your SolidWorks installation. If you want your VBA macro to understand SolidWorks API code, your macro must REFERENCE these type libraries. Guess what? By default, your SolidWorks VBA macro does references these libraries. You can see them if you go to Tools–>References while in the VB Editor.
What I just wrote about SolidWorks is true for Excel or any other application. VBA can’t “see” the API for an application unless its libraries (.tlb, .dll, or .exe) are referenced. Now here’s the big takeaway: if you want to integrate Excel API code into your SolidWorks macro, it is as simple as referencing the Excel libraries alongside your SolidWorks libraries. Indeed, you can reference as many libraries as you want. You could control Excel, Word, and Access in your SolidWorks macro if you wanted.
Enough technical background. Let’s actually make this happen.
Controlling Excel In A SolidWorks Macro
Setting up the reference to the Excel library is as simple as this:
- Open up a new VBA macro in SolidWorks
- In the VB Editor, go to Tools–>References
- Locate “Microsoft Excel 14.0 Type Library”, click the check box next to it, then click OK on the References dialog box
Now, to connect to Excel we’re going to use this code:
Dim xlApp As Excel.Application

Set xlApp = New Excel.Application
Notice its similarity to the code we use to get ISldWorks. Beyond that, learning how to work with the Excel API is really just as simple as using the Object Browser and Google a lot. Indeed, unlike SolidWorks, there is no “Excel API Help” contained with Excel. As an example, here’s some code that will display a message box for each row in the first column of a spreadsheet. (Place this sample spreadsheet in C:\ to use the following example.) Make sure that Excel is not already open while you run this code.
#If VBA7 Then

Declare PtrSafe Function PostMessage Lib "user32" Alias "PostMessageA" (ByVal hwnd As LongPtr, ByVal wMsg As Long, ByVal wParam As LongPtr, ByVal lParam As LongPtr) As Long

#Else

Declare Function PostMessage Lib "user32" Alias "PostMessageA" (ByVal hwnd As Long, ByVal wMsg As Long, ByVal wParam As Long, ByVal lParam As Long) As Long

#End If

Const WM_QUIT = &H12


Sub main()

    Dim swApp As SldWorks.SldWorks

    Set swApp = Application.SldWorks


    Dim xlApp As Excel.Application

    Dim xlWB As Excel.Workbook


    Set xlApp = New Excel.Application

    xlApp.Visible = False

    Set xlWB = xlApp.Workbooks.Open("C:\test.xls")


    'find number of rows with data

    Dim row As Integer

    row = 1

    With xlWB.Worksheets(1)

        While Cells(row, 1).Value <> ""

            swApp.SendMsgToUser2 Cells(row, 1).Text, swMbInformation, swMbOk

            row = row + 1

        Wend

    End With


    'clean up

    xlApp.Visible = True

    PostMessage xlApp.hwnd, WM_QUIT, 0, 0


    Set xlWB = Nothing

    Set xlApp = Nothing

End Sub
Two notes: 1) The Win32 API call is used to properly shut down Excel, otherwise a residual EXCEL.EXE process can remain that interferes with future attempts to use Excel, 2) If you get a compile error that says “User-defined type not defined”, it probably means that you did not set the correct references.
Interesting in learning how to create a 3D point cloud in SolidWorks using point data stored in an Excel spreadsheet? Check out Lesson 7.1 on our Videos page.
Controlling SolidWorks In An Excel Macro
Now that we know how to run Excel from SolidWorks, let’s do just the opposite. First, a note about the differences between SolidWorks and Excel macros. In SolidWorks, the VBA macro is its own file (.swp). You cannot store a SolidWorks macro in a SolidWorks document and then run it from there. In Excel, it’s the exact opposite. Macros cannot be saved as external files. They must be stored in the Excel document, and they must be run from there. To created, edit, run, or delete an Excel macro, follow these steps:
- Open Excel
- Go to the View tab in the ribbon bar
- Click the Macros button on the far right
- To create a new macro, start typing a name and then click Create, otherwise select a macro from the list and choose Run, Edit, or Delete
Once you’ve created a new macro, you’ll need to go to Tools–>References and add in “SldWorks 20XX Type Library”. Next, try out this code:
Dim swApp As SldWorks.SldWorks

Sub main()

    Set swApp = CreateObject("SldWorks.Application")

    swApp.Visible = True

    swApp.SendMsgToUser "Hello!"

End Sub
You should have a good idea of where to go from there. But what if you have more that one version of SolidWorks on your computer? How do you specify which one to open? Simply specify the version number like this:
Set swApp = CreateObject("SldWorks.Application.21")
Determine the version number for a major release like this: take the last two digits of the year (e.g., “13” for SolidWorks 2013) and add 8. Therefore, SolidWorks 2009’s version number is 17, 2013’s is 21, and so on.
What if, instead of opening a new instance of SolidWorks, you want to get an existing instance? Instead of calling CreateObject, use GetObject like this:
Set swApp = GetObject(, "SldWorks.Application")
Of course, you can also specify a version if you want:
Set swApp = GetObject(, "SldWorks.Application.21")
Storing An Excel Macro In A Design Table
Finally, for those of you who use design tables, I want to show you a cool trick. If you have an Excel macro that you would prefer to use to generate configurations in your design table, you can keep it embedded in the design table if you take the following steps:
- Create the design table in Excel
- Very important: save the design table as a .xls, NOT a .xlsm
- In your SolidWorks part or assembly, delete out the existing design table if it already has one
- Insert the design table you created in step 1, choosing the “From file” option
- Edit your design table in a new window and you should have access to your Excel macro in View–>Macros
Want to share any other tips or tricks for using Excel with SolidWorks? Please leave a comment!
Keith
Want to keep up with future CADSharp.com content, webinars, and special offers? Sign up for our newsletter.
Leave Comment
